
How to Install Z06 Stage 2 Wickers on a 2014+ C7 Stingray Z51 Corvette
Getting the C7 Stingray to look like a C7 Z06 involves a few modifications to the 2014+ Corvette body. The key visual differences between the Stingray and Z06 are:
- the front grill,
- the fender inserts at the front of the car,
- the Z06 brake scoops along the side of the Z06,
- The wider rear fascia,
- and the signature wicker spoiler system

With ACS Composite components, we offer you numerous mods that when combined can achieve an almost 100% Stingray to Z06 conversion. Such Corvette mods include:
- Rear widebody conversions
- Z06 Brake Scoops (if you do not want to do an widebody)
- Z06 Style Side Rockers
- Stage 2 or 3 Front Splitter
- Z06 Front Grill

ACS C7 Stingray Rear Widebody

ACS C7 Stingray Z06 Brake Scoops

ACS C7 Corvette Stingray Zero7 Side Rockers

ACS C7 Stage 2 Front Splitter

ACS C7 Z06 Front Grill
Until recently, installing the C7 Corvette z06 spoiler onto the c7 Stingray platform was a challenge. You had two options:
ACS Five1 Wickers
The ACS Five1 Wickers installed onto your Z51 spoiler, and offered a similar look to the Z06 stage 1 wickers. They come in two variants: One without visible bolts (requires rear fascia removal, but no drilling), and one with visible bolts (does not require rear fascia removal, but requires drilling).
If you are looking for wickers that matched the height of the OEM Stage 2 and 3, then these options are not for you. The Five1 provides a unique styling, and very minimalist spoiler look.

Note the absense of visible bolts.

Note the presence of visible bolts.
OEM Z06 Spoiler on C7 Stingray
Your next option is to remove your Z51 spoiler base, and swap it out with the OEM Z06 spoiler base. With the Z06 spoiler base installed, you can install the OEM Stage 2 and subsequent Stage 3 Polycarbonate bridge.
However, there are some issues with going this route.
- if you own a Z51, and therefore, have the z51 spoiler base, then you will be wasting that money by throwing out the Z51 spoiler.
- You still need to remove your rear fascia to install the new spoiler base
- The C7 z06 spoiler base is designed and made for the width of the 2015+ C7 Z06 Rear Fascia, which is about 1.5" wider on each side.
- At $1200-$1500, this is a costly mod to get the Stage 2/3 Spoiler on your C7 Stingray.
Regarding point three, the end result is a spoiler that overhangs your C7 Stingray Rear Bumper. Corvette designed that spoiler and its wickers to be tangent with the rear of the bumper.

We had enough of seeing these poorly done mods, and decided it was time for the C7 Stingray to have properly fitting Stage 2 Wickers that lined up with the car's width, looked integrated and secured properly.
ACS Stage 2 Wickers for C7 Stingray
The ACS Stage 2 Wickers for the C7 Stingray is our best spoiler option for the 2014+ Stingray.
Our Stage 2 Stingray Wickers are an exact representation of the Z07 spoiler package featured on the Z06, but designed and built to fit the C7 Stingray.

It was designed using the drawings of the Z51 spoiler to match the back portion so it could fit the surfaces well. Its design includes two filler support end caps to achieve an optimal fit onto the Z51 spoiler, and ultimately the Stingray.
The Stage 2 Wickers are compatible with the Stage 3 Center Bridge giving you the option of upgrading to the complete Z07 package for your C7 Stingray.

The Wickers perfectly line up with the ends of your Rear Fascia giving it the true Stage 2 look. They are finished in Carbon Flash Metallic black, come pre-drilled, taped, and ready to install.

Close-up of the Carbon Flash Metallic Black Stage 2 Wickers

Perfectly matching to the rear fascia width of the C7 Stingray
The Z51 Spoiler is required for this install, so if your Stingray does not have one, then you will need to pick one up. Finally, if you previously had the ACS Five1 Wickers on your Stingray, then you will still be able to upgrade to the Stage 2 Wickers. Let's get into the install of the Stage 2 Wickers:
How To Install Z06 Stage 2 Wickers On A C7 Corvette Stingray 2014+
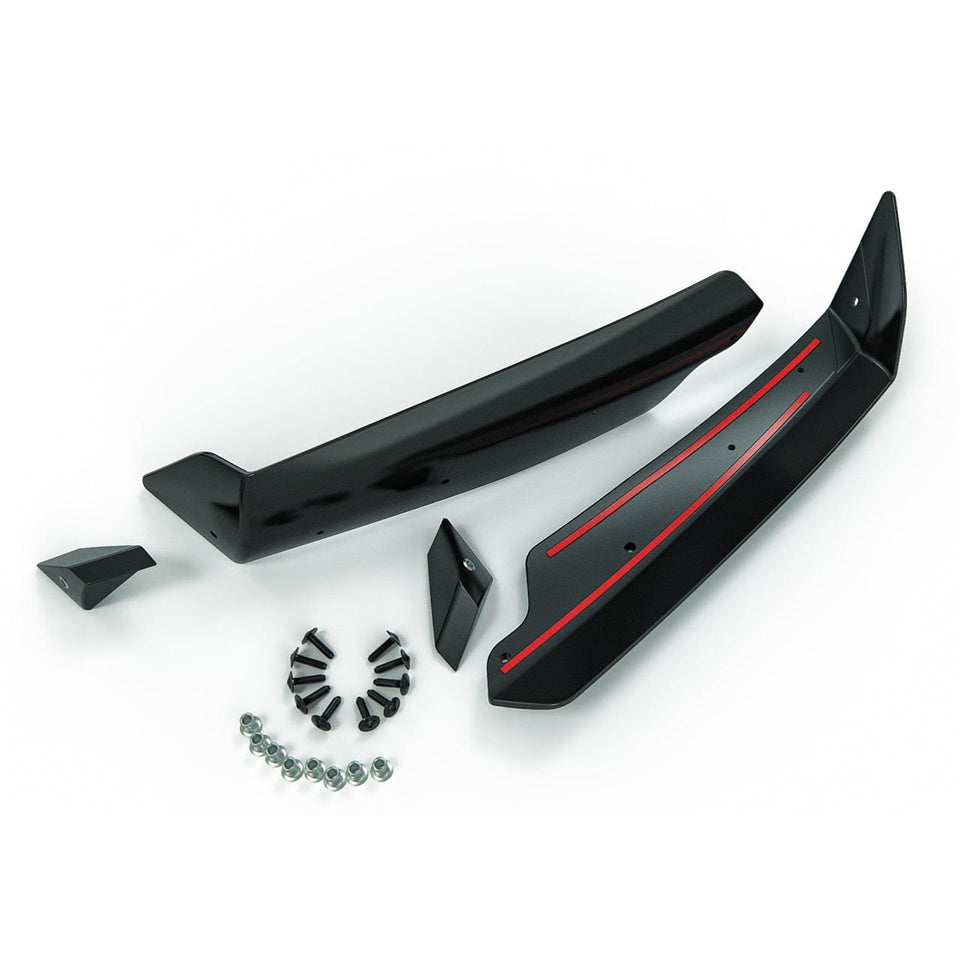
The ACS Stage 2 Wicker is installed on the Corvette's Z51 Spoiler, and you will receive the following items with your order:
You will need the following tools to the complete the installation:
You will start the installation process on one side of your vehicle's rear spoiler, and when you are done with that side, you will repeat the same steps for the other side. The steps of the installation process include:
- Surface Cleaning: clean the dirt on the spoiler surface using a solvent base cleaner and then remove wax and residue using an alcohol-based solution.
- Cover install area with masking tape to avoid scratching or marring the paint, and make marking holes easier.
- Trial fit the wicker to see how well it fits on your Corvette, and get a feel for how it should locate.
- Mark the wicker’s mounting holes for installation on the tape using a marker.
- Use a 6mm drill bit to drill pilot holes on the four marked holes on the spoiler.
- Use a 10 mm drill bit to drill the nominal hole, and then remove the masking tape.
- Riv nut installation: Install the rivnut onto your tool, and then insert into the drilled holes in the spoiler. Collapse the rivnut.
- T30 Screws: Position the wicker on the spoiler and screw on the T30 screws by turning the screws lightly. Do not fully tighten.
- Tape Removal: Remove the double sided tape on the wickers, then tighten the remaining screws
- End-Cap Installation:
- Apply masking tape to the end cap
- Position the endcap onto the spoiler, and adjust the wicker until it is parralel with the rear fascia
- Use a marker to mark the mounting hole out on the tape.
- Remove endcap from the spoiler.
- Use a 6mm drill bit to create a pilot hole on the end cap.
- Use a 10mm drill bit to turn the pilot hole into a nominal hole that will fit the rivnut.
- Use the rivnut tool to collapse a rivnut in the end cap hole.
- Remove the back tape on the end cap, along with the masking tape.
- Position the end cap between the spoiler and the wicker’s inner edge to fit the appropriate hole on the wicker
- Screw in the remaining T30 screws


How to install Stage 2 Wickers on C7 Stingrays with Five1 Wickers
If you already have the Five1 Wickers installed, then all you will need to do is to remove the Five1 wickers and then follow the installation steps for the Stage 2 wickers discussed above. You will have to redrill new holes on your spoiler for the Stage 2 Wickers, as the previous holes for the Five1 wickers will not work for the Stage 2 wickers.
Here is how to remove your ACS Five1 Wickers:
- T30 Screw Removal: turn the T30 screw in an anticlockwise direction to loosen it.
- Five1 Wickers Removal: after removing the T30 screws, remove the wickers by consistently pulling it, as there is a two-way tape behind it, holding it to the spoiler.
- Tape Remnant Removal: using a tape remover, remove the tape remnants, and then continue with steps one through six discussed above.


How to Install the Stage 3 Spoiler on a C7 Corvette Stingray
And for Corvette owners who intend to install a stage 3 bridge on their C7 Stingrays, whether immediately or in the near future, the installation process of the Stage 2 wickers for C7 Stingray is a bit similar to the main installation process, except for a few additions. The steps for the Stage 3 bridge installation come immediately after the first step of surface cleaning.
- Cover the surface where the stage 3 bridge will be installed with masking tape.
- Position the template on the rear spoiler and apply masking tape to hold it in position.
- Mark the template center points/holes on the tape beneath it using a marker.
- Use a 1/8” drill bit to drill pilot holes on the spoiler using the marked center points.
- Remove the template, and use a 10mm drill bit to turn the pilot holes into nominal holes.
- Remove the masking tape and use a rivnut tool to collapse rivnuts in the nominal holes.
After these steps, you can continue with steps 2 through 6 of how to install the Stage 2 wickers for the C7 Stingray. You will only have to drill two extra mounting holes on each side of your spoiler, as the last two holes on each side for the Stage 3 bridge will be used to hold both the stage 3 bridge and the wickers. Also, the stage 3 bridge is only mounted and screwed in after the wickers have been screwed in.
Install video
You can also watch us install the Stage 2 Wickers on a C7 Corvette Stingray in the video below where Joseph takes you through it step by step.
C7 Stingray spoiler options
This article went over a few options to choose from when selecting a spoiler for your C7 Stingray. Below you will find a table that can help you see the differences between the options.
| Spoiler | ACS Five1 Bolt-on | ACS Five1 Bolt-Less | OEM Stage 2 Spoiler | ACS Stage 2 Wickers |
|---|---|---|---|---|
| Price | $329 | $329 | $1049 | $399 |
| Requires Z51 Spoiler | Yes | Yes | No | Yes |
| Requires rear bumper removal | No | Yes | Yes | No |
| Overhangs bumper | No | No | Yes | No |
Got Questions?
With the installation guide complete, if you have any questions on the install, then you can reach out to us by phone or email, or you can order directly through our website.