The Best Way to Remove Rivets for Automotive Applications
Rivets are designed to create permanent joints. They provide strong, durable joints for various components like side rockers and front splitters.
However, there are times when rivets need to be removed, whether due to incorrect installation or part replacement. Proper rivet removal is crucial to avoid damaging the panels and maintaining the integrity of your Corvette.
This guide will show you how to remove rivets. It’ll help you tackle this with confidence and precision, keeping your Corvette in top condition.
What Exactly Are Rivets?
Rivets are fasteners used to join materials together in a permanent way. They consist of a smooth cylindrical shaft and a head on one end. Common types include solid rivets, split rivets, and pop rivets. Solid rivets are strong and used in heavy-duty applications.
Rivets are the ultimate bonding solution for a composite bodied car such as the Corvette. Split rivets in particular provide a strong hold and anti-vibrational properties unlike self-tapping screws which are intended for metal applications.
You'll often find self-tapping hardware or double-sided tape with aftermarket accessories made overseas in China. This is a weaker and cheaper solution.

All ACS Composite products are installed using high quality split rivets for durability and a secure bond between part and vehicle. Our products come with the necessary rivets for installation, ensuring reliable joints for Corvette accessories.
How to Install Rivets?
Installing rivets in your Corvette hardware is straightforward. You will need a hand riveter and a power drill. Start by drilling a hole using a 3/16-inch drill bit in the materials you want to join. The 3/16-inch drill bit will make a hole that matches the size of our rivet. Insert the rivet into the hole.

Use a rivet gun to pull the rivet’s mandrel, causing the head of the rivet to expand and secure the materials together. For an efficient installation process, consider the ACS Composite Hand Riveter Kit. This kit includes everything you need for quick and accurate rivet installation.


It's designed to make the job easier and keep your rivets securely in place. Using high-quality tools guarantees that your Corvette accessories are installed correctly, providing durability and reliability. Proper installation of rivets is vital for maintaining the integrity and performance of your Corvette.
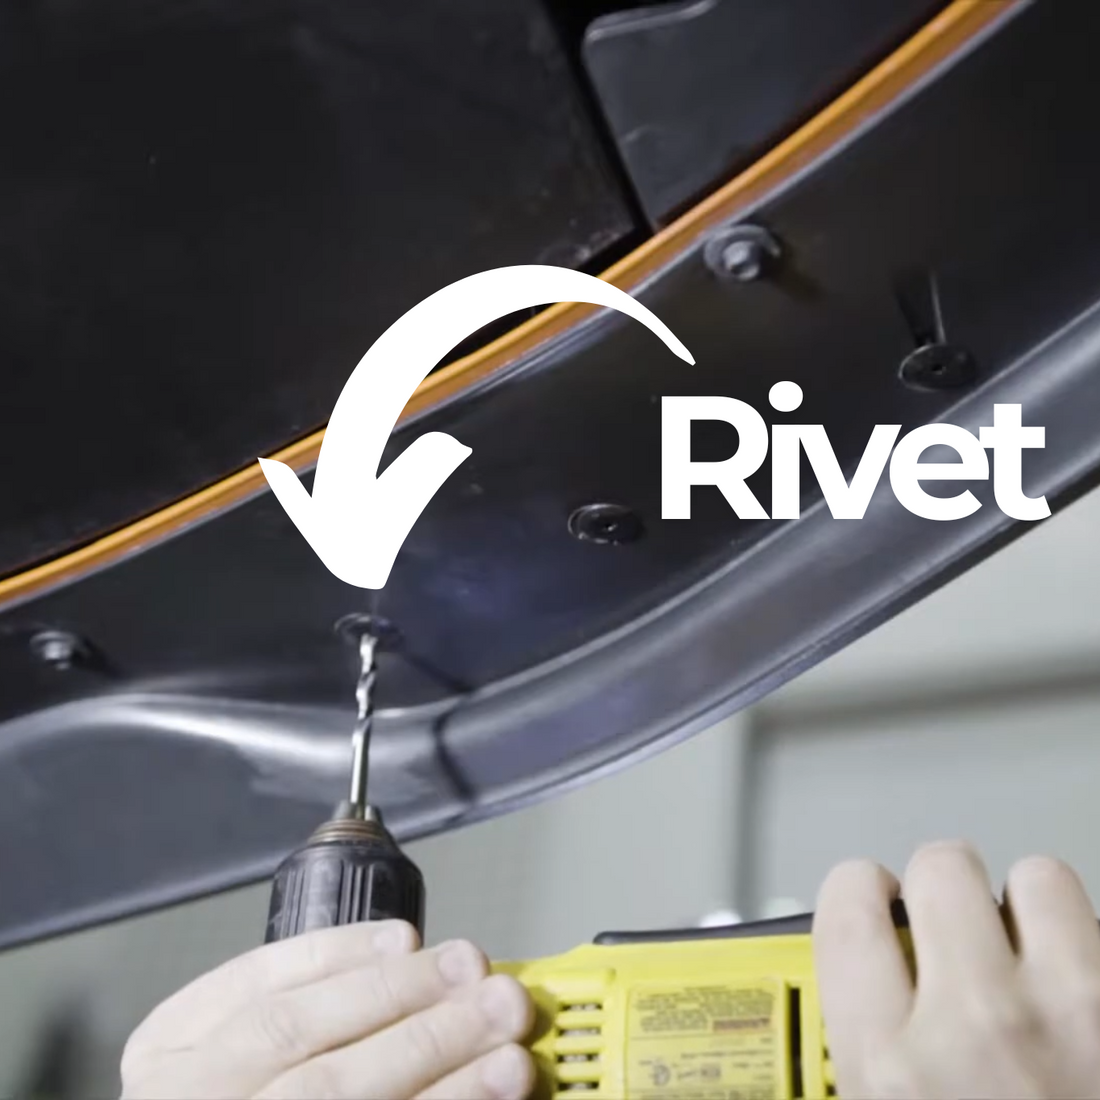
Best Method to Remove a Rivet: Drilling Out the Rivet
Drilling out the rivet is the ideal solution for removing rivets and uninstalling Corvette parts. It’s delicate and reduces the risk of damaging panels. This method allows for finer grain control when removing the rivet, ensuring your Corvette accessories stay intact.
Tools Required
- A Power Drill
- A 3/16-Inch Drill Bit
Step 1: Positioning the Drill
ACS rivets come with a small hole where the mandrel snaps off during installation. This feature makes it easy to position the drill bit. Place the drill bit in the center and perpendicular. This maintains precision and prevents slipping, which can cause unwanted damage to your Corvette’s panels.

Step 2: Drilling Through the Rivet Head
Set the drill speed to low for better control. Slowly drill through the rivet head. If the head starts to spin without breaking, slightly tilt the drill to break it off. This method minimizes the risk of damaging the surrounding material and provides a clean removal process. Make sure you are drilling straight to avoid enlarging the hole, which can weaken the joint and require you to install larger rivets.

Step 3: Removing the Rivet Shaft
After the rivet head is removed, use the drill bit to push out any remaining debris. You can also use compressed air to clean out shavings that may be left behind. This step ensures that the area is clear for installing new rivets..


For a visual guide on removing rivets, check out this video tutorial.
Alternative Method: Grinding
Although drilling is the best way to remove a rivet, it might not always work. Don’t worry; we have an alternative. Grinding is another effective way to remove rivets, especially for stubborn ones that continue to spin when drilling.
Tools Required
- Grinder or rotary tool
- Center punch
- Hammer
Step-by-Step Guide
- Carefully grind the rivet head using the grinder or rotary tool. Avoid touching the surrounding materials to prevent damage.
- Once the head is removed, use a hammer and punch to push out the remaining rivet shaft and shavings.
Pros and Cons
-
Pros:
- Quick removal method
- Effective on solid and some pop rivets
-
Cons:
- Risk of damaging surrounding components
Final Words
To wrap up, drilling out rivets is the preferred method for removing rivets from our Corvette accessories due to its precision and reduced risk of damage. Grinding is a reliable alternative when drilling isn't suitable. Ultimately, your goal is to remove the rivet head, and everything else will follow.
Always use high-quality tools like a power drill, a good drill bit, and a grinder to get the best results. Proper techniques help maintain the integrity and performance of your Corvette accessories, such as side rockers and front splitters
For all your Corvette hardware needs, trust ACS Composite for durable and reliable products. Browse our site to explore our full range of automotive hardware and accessories designed specifically for Corvette enthusiasts and DIY’ers.